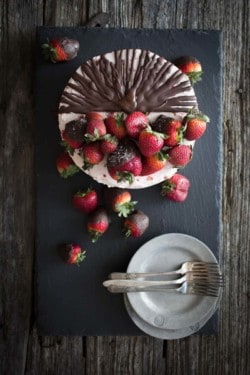
Chocolate Covered Strawberry Cake
Don't feel like making multiple layers, icing and decorating a cake? No worries, this cake is even delicious un-iced with fresh berries and whip cream too!
- Prep Time: 15 mins
- Cook Time: 70 mins
- Total Time: 1 hour 25 mins
- Yield: 2 (8-inch) layers 1x
- Category: dessert
- Method: baked
- Cuisine: gluten free
Ingredients
Scale
- 4 tablespoons golden flax seed meal
- 3/4 cup water
- 3 cups Enjoy Life Gluten Free All-Purpose Flour
- 3 teaspoons xanthan gum
- 2 cups granulated sugar
- 2 teaspoons baking powder
- 2 teaspoons baking soda
- 1/2 teaspoon kosher salt
- 2/3 cup vegetable oil
- 2 cup pureed strawberries, pureed until completley liquid
- 2 tablespoons Tahitian vanilla extract
- 2 tablespoons orange juice
- 1 cup Enjoy Life Semi-Sweet Chocolate Mini Chips
To decorate
- 1 batch vegan strawberry buttercream, recipe follows
- 5 or 6 vegan salted chocolate covered strawberries, optional
- 5 or 6 whole strawberries
- extra chocolate drizzle from dripping strawberries, if desired
For the Icing:
- 1 cup vegan butter, softened
- 1 teaspoon Tahitian vanilla extract
- 2 1/2 - 3 cups powdered sugar
- 2 teaspoons nondairy milk
- 1/2 cup finely diced strawberries
Instructions
Make the cake:
- Preheat the oven to 325°F and spray 2 (8-inch) round baking pans with baking spray, set aside.
- In a small bowl combine the flax seed meal and water, stir to combine and set aside for 5 minutes.
- In a large mixing bowl combine the Enjoy Life Gluten Free All-Purpose Flour, xanthan gum, sugar, baking powder, baking soda and salt. Mix well with a whisk until combined.
- In a separate bowl combine the vegetable oil, pureed strawberries, vanilla extract and orange juice. Beat with a whisk until completely combined.
- Add the liquid ingredients to the dry ingredients and stir with a wooden spoon until completely incorporated then fold in the Enjoy Life Semi-Sweet Chocolate Mini Chips.
- Divide the batter between the 2 pans, tap the pans firmly on the counter to ensure that no air bubbles are trapped in the batter and that the batter is level.
- Bake on the middle rack of the preheated oven for 60-75 minutes until the cakes are golden brown and a toothpick inserted into the center comes out clean.
- Allow the cakes to cool completely on wire racks in the baking pans.
Make the icing:
- Place the softened vegan butter in a mixing bowl and beat until light and fluffy. Add the vanilla and mix once more until combined.
- Add the powdered sugar 1/2 cup at a time and continue mixing until thick and creamy. Drizzle in the non-dairy milk a little at a time to thin. Gently fold in the berries.
If icing and decorating the cake:
- Once the cake layers have cooled wrap them individually in plastic wrap then place in the freezer until frozen solid about 4-6 hours.
- Once frozen, remove and unwrap the first layer and carefully use a serrated knife to level the top of the cake. This will ensure the layers are beautiful once you cut a slice. Repeat the process with the second layer.
- Place the first layer, leveled side up, on a cake stand and add about 1/2 cup of the prepared strawberry buttercream icing on top, smooth out evenly towards the edges with an offset spatula then gently place the second layer, leveled side up on top.
- Starting with the sides ice the cake using the offset spatula to create a smooth finish to the icing. Once the cake is completely iced transfer to the refrigerator to chill.
To decorate
- Place a sheet of parchment paper across the top of your iced cake, directly down the center. Drizzle melted chocolate, from dipping the strawberries, across the top of the cake and down the sides. Since the cake is chilled the chocolate will almost instantly harden. Once you are happy with the chocolate drizzle and it has set, remove the parchment and decorate the other half of the cake with the vegan salted chocolate covered strawberries and the plain berries. Serve immediately and store any leftovers covered in the refrigerator for up to 3 days.
Nutrition
- Serving Size: 1 slice
- Calories: 830
- Sugar: 104.2 g
- Sodium: 597.7 mg
- Fat: 18.4 g
- Carbohydrates: 159.7 g
- Protein: 7.2 g
- Cholesterol: 9.3 mg
Find it online: https://thismessisours.com/chocolate-covered-strawberry-cake/