If there were ever a moment for leaning into kitchen magic, it’s December. The days are shorter, the grocery carts are fuller, and suddenly everyone we love becomes a potential giftee. And honestly? There’s no better gift than a batch of homemade caramel wrapped in little wax-paper packets that look like something out of an old-school candy shop.
This is the kind of holiday project that makes your whole kitchen smell like butter, vanilla, and cozy intentions. It’s also one of those foolproof recipes that feels impressive without being fussy — as long as you keep an eye on that candy thermometer and trust the process.
And because you know me, you know we’re not just making any caramel. We’re making deeply flavorful, fruit-forward, holiday-worthy homemade caramels using something a little unexpected: fruit juice.
Yes, fruit juice. Stay with me.
The Magic of Fruit Juice Caramel (Trust Me on This One)
If you’ve only ever made caramel with white sugar and water, prepare to have your mind gently blown. Using fruit juice — prune juice in this recipe, but apple cider, orange juice, or even cranberry juice do incredible things here — adds natural depth, dimension, and a subtle sweetness that makes people go, “Wait… what is that flavor?”
Reducing the juice at the beginning of the cooking process concentrates all that goodness down into a thick, glossy base that blends beautifully with melted butter, brown sugar, heavy cream, and vanilla. The caramel mixture becomes rich, complex, and just slightly tangy. It’s the perfect balance between classic and creative.
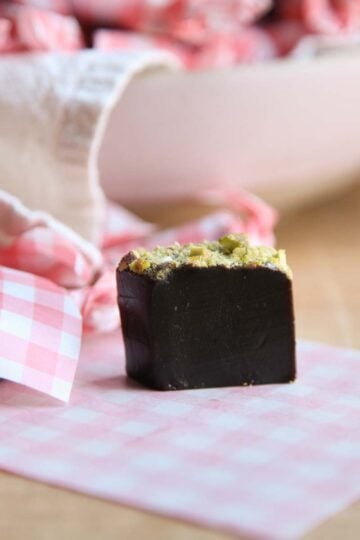
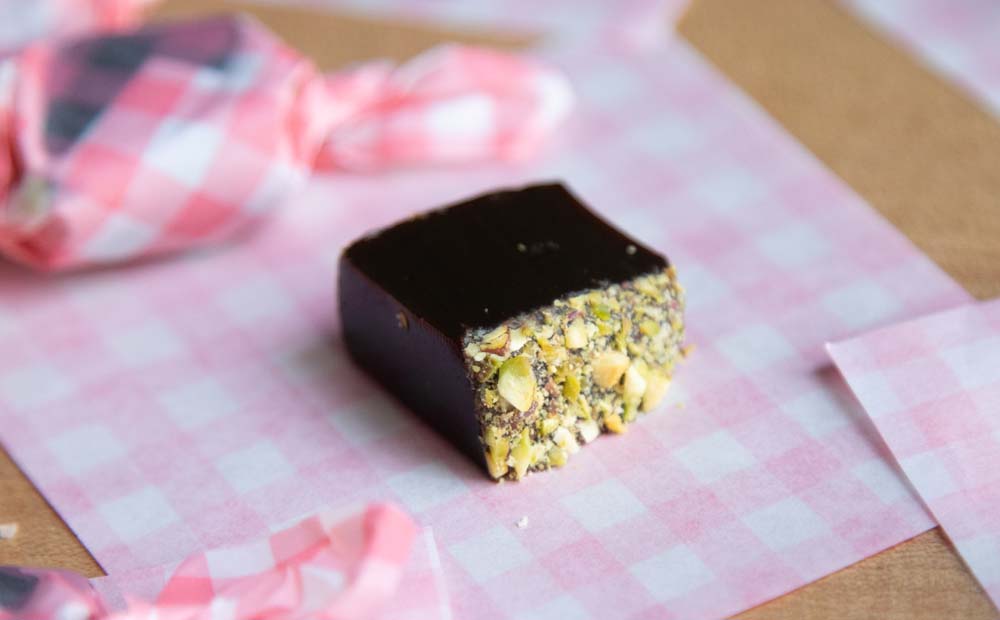
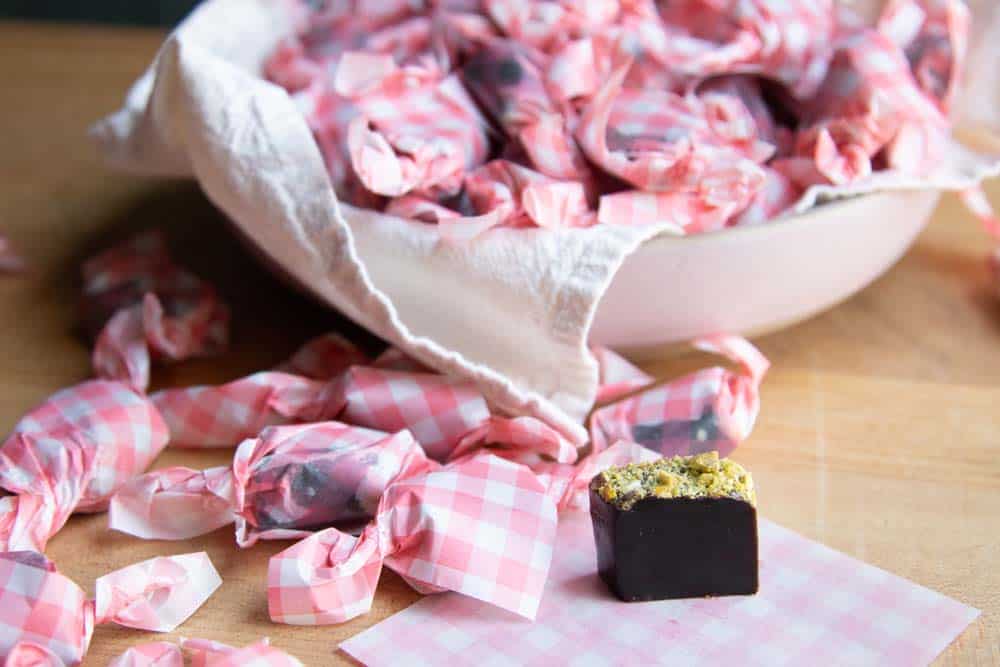
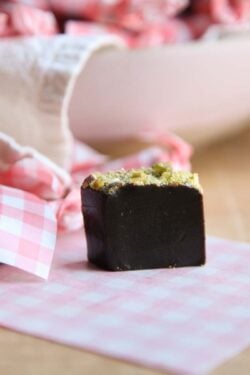
And when the hot sugar cools into shiny little squares topped with pistachios? Holiday hero material.
What Makes This Homemade Caramel Recipe So Good?
Let me paint you a holiday picture:
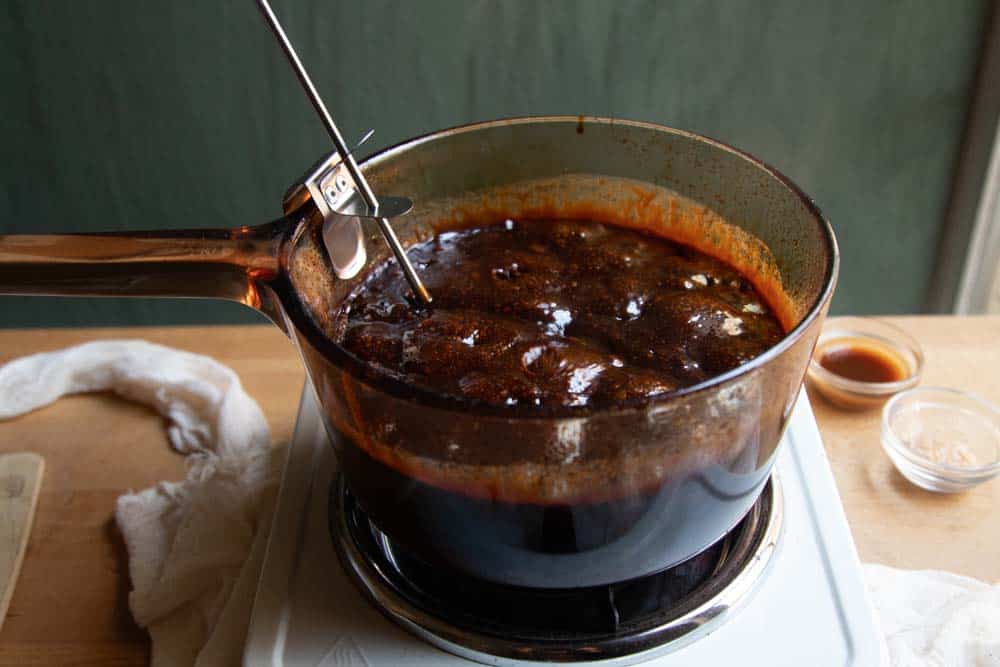
You’re in your cozy kitchen, stirring the molten mixture of juice and sugar slowly with your wooden spoon. The sugar dissolves. The caramel mixture darkens. There’s that moment — right before you hit the correct temperature — when the whole pot smells like toffee, melted butter, and pure winter nostalgia.
Then, the magic number hits. You stir in vanilla and a pinch of salt, pour everything into a parchment-lined pan, and immediately feel like the kind of person who gives Martha Stewart a tiny bit of competition.
This homemade caramel recipe works perfectly because:
- Simple ingredients do the heavy lifting. Brown sugar, white sugar, butter, heavy whipping cream — each one has a job, and they perform beautifully.
- A candy thermometer removes the guesswork. Medium heat + the right temperature = reliable results.
- The fruit juice reduction adds unmistakable flavor. It’s like adding a secret ingredient without actually keeping secrets.
- The texture is dreamy. Soft, chewy, but still sliceable. The perfect caramel.
- It stores beautifully. Just tuck the pieces into an airtight container at room temperature and try not to eat them all before gifting day.
This is holiday candy-making at its most fun — especially if it’s your first time.
Why Homemade Caramels Make the Best Holiday Gift
There’s something wildly charming about receiving a gift that clearly took time, intention, and a little kitchen chaos. Homemade caramels check all the boxes:
- They feel nostalgic.
- They look adorable wrapped up individually.
- They’re far more delicious than anything store-bought.
- They’re affordable, customizable, and endlessly giftable.
Plus, you can flavor these beauties with almost any juice you love. Apple cider caramel for your neighbor who decorates before Thanksgiving? Done. Orange-infused caramel for your citrus-obsessed sister? Easy. Cranberry caramel for that one friend who always chooses the chicest thing on the menu? Absolutely.
Once you start making variations, you will not stop. The cooking process becomes strangely meditative — a little stirring, a little bubbling, a little marveling at how sugar and cream turn into something so ridiculously good.
Tips to Make Your Homemade Caramel Truly Shine
Think of this as caramel wisdom collected from years of holiday gifting and the occasional late-night batch:
- Prep your pan first. Lining the pan with parchment makes cleanup (and cutting) much easier.
- Let the caramel cool completely before slicing. Room temperature is your friend.
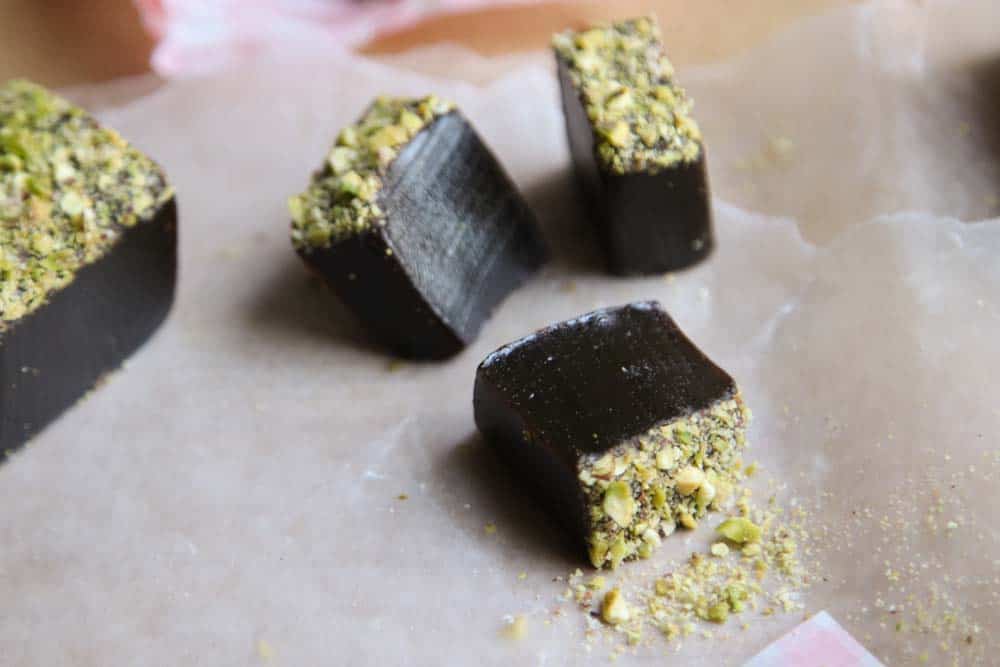
- A lightly oiled knife = clean edges. Your future self will thank you.
- Wrap each piece individually. It keeps them from sticking together and makes them look delightfully old-fashioned.
- Don't rush the fruit reduction. That concentrated flavor is the soul of this delicious caramel.
And if the caramel mixture looks suspiciously bubbly or too glossy along the way? Don’t panic. Hot sugar loves drama. Let it do its thing.
Looking for More Homemade Gifts?
If you’re already planning to spend a cozy afternoon in the kitchen, consider making a few edible extras. I created both of these recipes for CA GROWN, and I know your friends and family are going to love them:
- DIY Gifts for the Mixologist in Your Life — loads of creative, delicious inspiration
https://californiagrown.org/recipes/gift-for-a-foodie/ - Homemade Soup Mixes for Winter — charming, wholesome, delicious
https://californiagrown.org/recipes/soup-mixes/
Before You Go, Help Us Spread the Caramel Love
If you make this homemade caramel recipe, please leave a comment and a rating. Share it on Instagram and tag me so I can cheer you on.
Your kitchen makes magic — you make magic — and I love seeing what you’re stirring, slicing, and gifting all season long.
Happy caramel-making, friends. ✨
Fruity Homemade Caramels
- Prep Time: 1 hour
- Cook Time: 2 hours
- Total Time: 3 hours
- Yield: 64 caramels 1x
- Category: Dessert
- Method: Stove top
- Cuisine: American
Ingredients
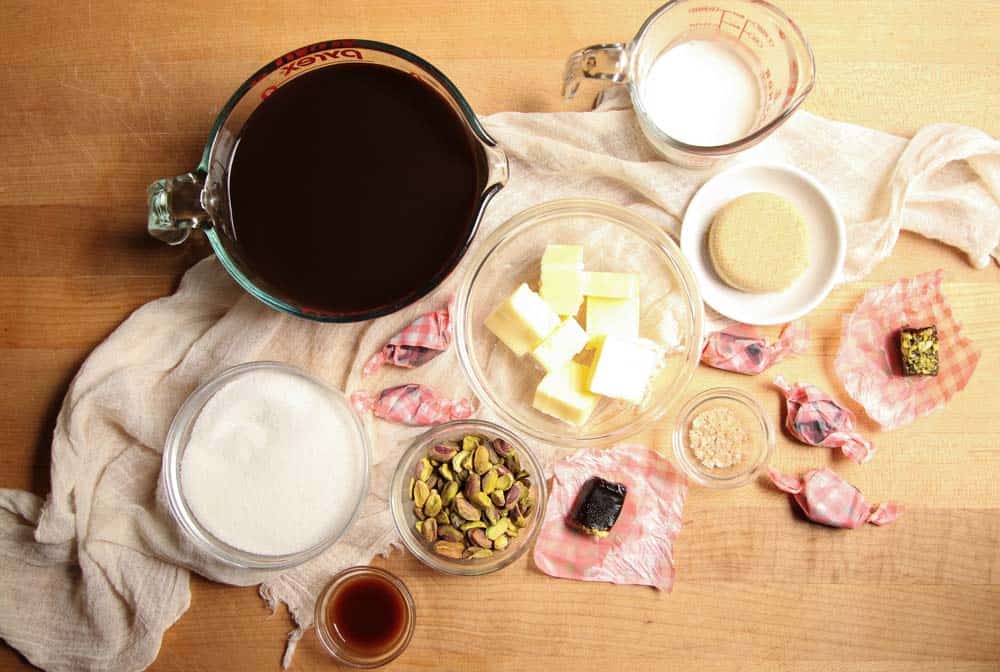
4 cups prune juice
½ cup unsalted butter room temperature, cut into tablespoon pieces
1 cup granulated sugar
½ cup light brown sugar
⅓ cup heavy whipping cream
3 teaspoons vanilla paste or extract
½ teaspoon flaky sea salt
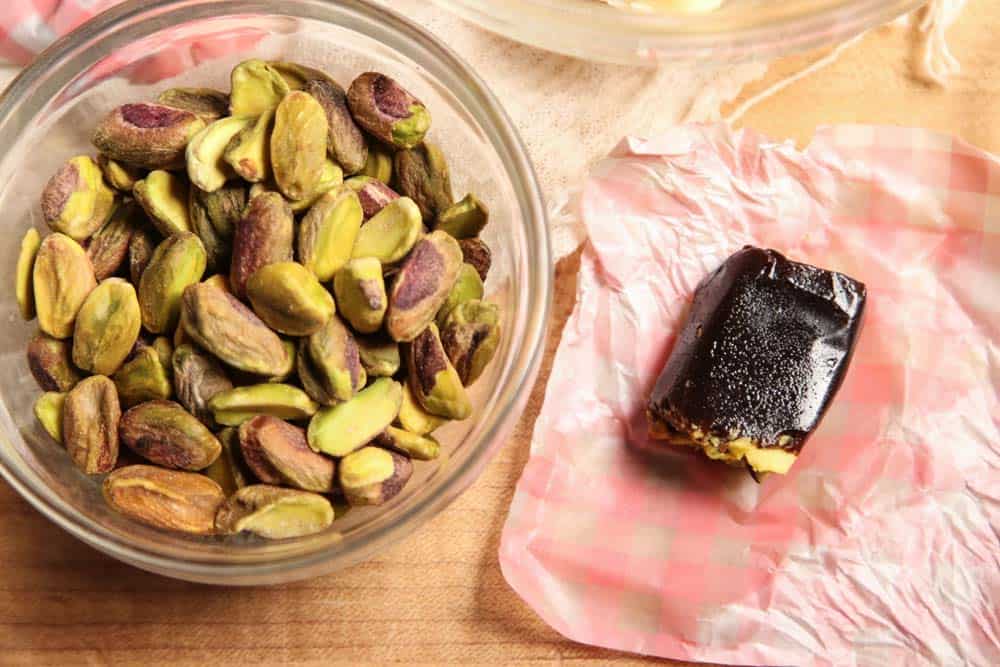
¼ cup raw pistachios, minced
Instructions
Bring the prune juice to a boil, then reduce to a simmer for about one hour, occasionally scraping down the sides.
While the prune juice is reducing, prepare the remaining ingredients. Also, grease a loaf pan and add two strips of parchment paper to completely cover the bottom of the pan and sides. Also, cut 64 pieces of wax paper into roughly 4-inch squares.
Cook down the juice until it reaches a slightly thick, syrupy consistency and yields about ½ cup. Swipe your finger across a rubber spatula to feel the consistency of the reduction.
Once the juice has reduced, add the butter, granulated sugar, brown sugar, and heavy cream, stirring to combine.
Turn the heat to medium and bring the mixture to 255℉, stirring occasionally. Once the caramel reaches temperature, remove it from the heat and stir in vanilla and salt.
Pour the caramel into the prepared pan, spread the minced pistachios on the top, and place it into the fridge (uncovered) for about two hours.
Once the caramel has solidified, carefully coat the blade of a sharp chef's knife with neutral oil, such as grapeseed oil, and cut into the desired sizes. Add a swipe of oil to the blade in between each cut.
Separate the caramels immediately (keeping them on parchment or wax paper) so they don't stick together, then wrap each caramel individually in wax paper.
Nutrition
- Serving Size: 2 pieces
- Calories: 95
- Sugar: 14.9 g
- Sodium: 27.3 mg
- Fat: 3.8 g
- Carbohydrates: 15.5 g
- Protein: 0.5 g
- Cholesterol: 9 mg


Anonymous says
yum!
Suzanne says
OMG these were a hit at my dinner! Thank You!