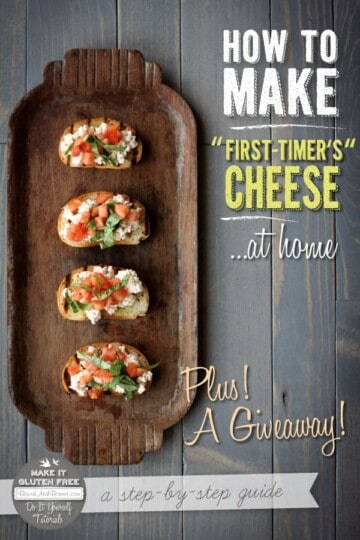
Over here at B&B we enjoy the occasional cheesy fare. We have dear friends that own a creamery back in Georgia and although we have always been fascinated by the cheese making process, we were too intimidated to try it ourselves at home. So naturally, when I was recently approached to review Claudia Lucero's new book, One-Hour Cheese, and I noticed that there was a recipe for easy First-Timer's Cheese I knew that I had to make it for myself and share it here with all of you.
I honestly wasn't sure what to expect when making this particular type of cheese, but since my kids and I are always up for a fun science experiment we gave it a go. This cheese was fun to make, super fast, and pretty tasty on bruschetta. (With a gluten free baguette, of course!) When you get right down to it First-Timer's Cheese is basically a farmers cheese, you have heard of that before right? Before we get into the art of making cheese at home let's talk about this fun book a bit shall we?

This entire book is inspired by Claudia's quest to rediscover the ancient roots of cheesemaking and embrace the homesteading movement, ONE HOUR CHEESE (Workman, May 2014) is an indispensible guide to creating fresh, simple cheeses with ease in your very own kitchen. Based on thousands of years of cheesemaking wisdom, the approach is simple: heat milk, add coagulant, drain, salt, and press. Simplified further with the guidance of Claudia, the self-taught Portland-based cheese maven behind Urbancheesecraft.com, whose DIY Cheese Kits sell at Williams-Sonoma and on Etsy, anyone can take on this beloved food at home.
I personally am a long time fan of Claudia and her work. I first learned about her through a short documentary that Etsy created a few years ago. The local food movement is so near and dear to my heart and I love seeing passionate food artisans like Claudia thrive doing what they do best all while supporting local farmers and growers in their own communities.
Another reason that I felt this book was very much in-line with what we do here at Beard and Bonnet is the way that it is laid out. Claudia takes you step by step through every single recipe with in depth tutorials, lots of images showing you every single stage, and a fun informative voice. I personally have never seen a cookbook laid out like this and I love it! I have poured through the recipes for all 16 cheeses – each with endless variations, no complex instructions, no hard-to-find ingredients, and no excessive prep time. The book starts with favorites like Ricotta and Chèvre and then veers to the more exotic with recipes for Paneer and Burrata, and finally Claudia shows how to customize using a wide range of flavorings from herbs to nutmeg to lemon juice. The possibilities are endless and the results are nothing short of delicious.
After this fun tutorial there is a giveaway for Claudia's book so be sure you enter for a chance to win!
Let's make some cheese!!!
Step 1: Pour 4 cups milk into a 2-quart saucepan and heat it on medium as you stir.

Look for foam to begin forming around the inside edges of the pot as well as little simmer bubbles coming from the bottom—not a rolling boil, but close. Stir continuously so that a skin doesn't form on the milk's surface.
Step 2: Add vinegar

When you see the bubbles as described, start slowly pouring in the vinegar (you may not need it all) and stir gently to incorporate it until you see the clear separation of curds (white solids) and whey (clearish liquid). The separation you see is called coagulation. When you see coagulation and the liquid no longer looks like plain milk, turn the heat to low and stir the curds very, very gently as you cook them for 2 more minutes.
Step 3: Drain the whey and mix in spices.

Add salt and pepper (and herbs, if you like) to taste. Stir them into the curds evenly and . . .
Voilà, YOU MADE CHEESE! To be specific, you made a directly acidified farmer-style cheese. It will taste great crumbled onto salads, pizza, tacos, and chili or just eaten simply with crusty bread and ripe tomatoes.
PrintHow To Make First-Timer's Cheese
- Cook Time: 30 mins
- Total Time: 30 mins
- Yield: ½ pound 1x
Ingredients
Supplies you will need
- 2-quart saucepan or stockpot
- slotted spoon or small mesh strainer
- 1-quart bowl
Ingredients
- 1 quart (4 cups) cow’s milk, any type
- ⅛ cup vinegar (basic white, white wine, or apple cider) OR ⅛ cup lemon or lime juice
- ¼ teaspoon salt to taste (sea salt, flake salt, or any salt you like)
- Ground pepper and/or herbs of your choice (dry or fresh will work)
Instructions
- Pour the milk into the saucepan and heat it on medium as you stir. Look for foam around the inside edges of the pot as well as little simmer bubbles coming from the bottom—not a rolling boil, but close.
- When you see the bubbles as described, start slowly pouring in the vinegar (you may not need it all) and stir gently to incorporate it until you see the clear separation of curds (white solids) and whey (clearish liquid). The separation you see is called coagulation.
- When you see coagulation and the liquid no longer looks like plain milk, turn the heat to low and stir the curds very, very gently as you cook them for 2 more minutes.
- Turn off the heat and use the slotted spoon or strainer to scoop the curds into the bowl while leaving behind in the saucepan as much whey as possible. When you have all of the curds, drain any whey that has collected in the bowl. 5 Add salt and pepper (and herbs, if you like) to taste. Stir them into the curds evenly and . . .
- Voilà, YOU MADE CHEESE! To be specific, you made a directly acidified farmer-style cheese. It will taste great crumbled onto salads, pizza, tacos, and chili or just eaten simply with crusty bread and ripe tomatoes.
- And did you time yourself? Well under an hour. (I told you!) Congratulations—this is just the beginning.
Contest begins at 12:00 am PST 6/2/2014
a Rafflecopter giveaway


H says
Im guessing this doesn't work with soy milk? When I make vegan buttermilk I add vinegar/lemon juice to soy milk, and it gets thicker.
Meg says
I am not really sure...this post was part of a book review so, I didn't really stray from the original recipe. Let me know if you give it a try with soy. I would love to know if it turns out!
Sarah L. says
I just added the book to my Amazon Wishlist - and I'll try this recipe next week!
Meg says
Yay Sarah!!! I hope you have a s much fun making it as we did.
Anita Easton says
I failed at making cottage cheese but that may not technically be a cheese. I would like to succeed because we use a lot of it.
I use a lot of Jack/cheddar, colby, because we love mexican food.
glad I found your site. My son's family and our's are trying to be gluten free but recipes are limited and sometime expensive.
Thanks, Anita
Meg says
Thanks so much for your comment Anita! I am so glad that you found us here at B&B. I know what you mean about expensive ingredients and you will see as you look around the site we try to limit the use of those:)
Susan says
My favorite cheese is probably feta, especially when made with goat or sheep's milk.
mysweetiepiepie says
I'm a Brie girl all the way.
Sylvie | Gourmande in the Kitchen says
I love the concept of one hour cheese, cheese-making tends to sound intimidating but one hour is very approachable.
Meg says
I know right Sylvie?! I am amazed by how many different types of cheeses Claudia covers in this book that can be made in an hour or less.