Before I get into the amazing Icebox Cake, I have a little personal news. Maybe you have noticed that lately I haven't been as active here as I normally am - that is because I have been working away behind the scenes on quite a few super exciting projects that I cannot wait to share with you. One of the biggest projects of late has been the amazing opportunity to act as Editor in Chief of Go Gluten Free magazine's summer 2015 issue! After a lot of intense work and plenty of sleepless nights I am thrilled to say that the issue is within days of being shipped off to print and now all that is left is to eagerly await it's arrival on the new stands in May.
Working on the magazine seemed to make the subject of color a reoccurring conversation in my daily life. I found myself over and over being drawn to recipes, images, and stories that really embraced eating the rainbow and leading a colorful life.
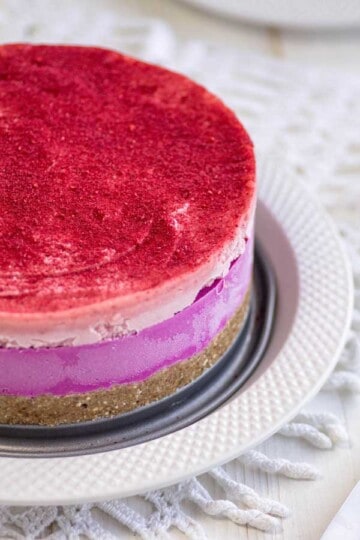
This Dragon Fruit and Berry Icebox Cake doubles as a delicious dessert and beautiful centerpiece!
I already knew that bold, beautiful, sometimes even obnoxious colors get me and bring a huge smile to my face. They captivate my attention, and they move me. Maybe this is why we choose to hang colorful graffiti art on the walls of our home. Maybe this is why I was drawn to my husband who shows no fear when it comes to color in his designs. Maybe - just maybe this is why my obsession with colorful latte bowls is teetering on the edge of needing an intervention and I know it is definitely behind my obsession with dragon fruit.
There is just something about that flamingo pink hue that only dragon fruit can impart. No, there isn't any added food coloring here in this technicolor icebox cake. Just loads of raw fruit, nuts and a few spices in this beauty!
If you’ve tried this Dragon Fruit and Berry Icebox Cake Recipe, I would be so grateful if you would rate it. Let me know what you think in the comments below. I just love hearing from you, and your reviews and comments really help others that visit This Mess is Ours!
Dragon Fruit and Berry Icebox Cake
Don’t forget to rate the recipe, and let me know what you think about this Dragon Fruit and Berry Icebox Cake in the comments below. I just love hearing from you. Your reviews/comments really help other people that visit This Mess is Ours!
- Prep Time: 35 mins
- Total Time: 35 mins
- Yield: 8-10 slices 1x
Ingredients
- ½ cup raw almonds
- 1 cup gluten free rolled oats
- 1 cup chopped, pitted Medjool dates
- ¼ teaspoon salt
- ½ cup shredded, sweetened coconut
- 1 tablespoon vanilla bean paste
- 2 cups raw cashews, soaked in water for at least 30 minutes preferably overnight
- ⅓ cup coconut oil, in liquid form
- ½ cup light agave
- ¼ cup freshly squeezed lime juice
- Zest of 1 lime
- 2 (3.5 ounce) dragon fruit smoothie packs
- 2 large frozen bananas cut into 1-2 inch chunks
- 2 tablespoons almond milk
- 1½ teaspoons vanilla bean paste
- 1 cup frozen organic strawberries
- ½ cup freeze dried raspberries crushed into a powder
Instructions
- Make the crust: In the bowl of a food processor fitted with the “S” blade combine the almonds, oats, dates, salt, coconut, and vanilla bean paste. Process until the ingredients begin to clump together, about 2-3 minutes. Transfer the mixture to an 8-inch spring form pan, gently pressing the crust into the pan and around the edges until the crust layer is level and smooth.
- Dragon Fruit Layer: In the bowl of a clean food processor fitted with the “S” blade or in a high powered blender combine the soaked cashews, coconut oil, agave, lime zest, lime juice, and smoothie packs. Blend until completely smooth, stopping to scrape the sides as necessary. This step can take anywhere from 3-5 minutes depending on the strength of your machine. Pour the blended cashew layer over the crust. Smooth the top with a rubber spatula until even and gently tap the pan against the kitchen counter to release any air bubbles that are trapped in the filling. Cover and place the pan in the freezer for 2 hours to set.
- Strawberry “Ice Cream” Layer: In the bowl of a clean food processor fitted with the “S” blade combine the frozen banana pieces, almond milk, and vanilla paste. Process until the mixture resembles the consistency of soft serve ice cream; this will take at least 2-3 minutes. If your food processor seems to be struggling feel free to add another tablespoon of almond milk. Once the bananas are to the right consistency add the frozen strawberries and process again, scraping the sides as necessary, until the berries are incorporated and the mixture resembles soft serve ice cream. Pour the “ice cream” over the partially frozen dragonfruit layer and smooth the top with a silicone spatula. Gently tap the pan against the kitchen counter to release any air bubbles that are trapped in the filling and place in the freezer until set, about 3-4 hours.
- To serve: Place the spring form pan refrigerator for 30 minutes. Gently remove the side wall of the pan from the cake. Using a small mesh strainer gently sift raspberry powder over the top of the cake. Slice and serve. Store any uneaten cake completely wrapped in the freezer.
Want to be a part of our online community outside of the blog? It’s easy!! All you have to do is follow @THISMESSISOURS on FACEBOOK, INSTAGRAM, TWITTER, YOUTUBE, or PINTEREST to see cooking demos and peeks into our day to day life.
What are the health benefits of strawberries?
Strawberries are a fabulous source of Vitamin C, antioxidants, and fiber. This low calorie fruit is beneficial in promoting heart health and fighting against cancer.
Click here for more information on the health benefits of strawberries.


Sherrie says
Oh you rock, you rock, you rock!!
Meg says
I heart you big time Sherrie!
Kate says
This cake is a real stunner! Can not wait to see that Go Gluten Free issue--I know it's going to be gorgeous!
Amina says
I'm fairly new to gf foods. I have hypothyroidism and urticaria. So I'm allergic to different foods at certain times. Some days I just feel like giving up but my grandchildren keep me going. I'm so excited about your recipes. It reads wonderful. Now I have to try it. Thanks for making it easy for us.
Meg says
Thank you so much for commenting Amina! I am so happy you have found our site and I hope you love the recipes:)
Ginny says
Hi Meg, this looks fantastic!!
Is there anything I can sub in for the cashews? Bella is allergic to cashews and peanuts.
Meg says
Hey Ginny! You can use an equal amount of any other nut in their place, just know that some of them you will have to soak longer. Those with a high fat content give the most similar, creamy results I would try macadamias or pine nuts first. Almonds may work, but I am unsure how smooth the final texture would be. I haven't tried a substitute like this for myself yet, so please let me know how it works out!
Lisa says
Looks amazing Meg!
Meg says
Thanks so much Lisa!
aida mollenkamp says
Congrats on the EIC role – I can't wait to see what you do!
Meg says
Thank you so much Aida! I cannot wait to share it 🙂
Jenn says
Wow! Absolutely gorgeous! And congrats on the magazine gig....that's big time!
Meg says
Thank you Jenn!
Sam ~ it doesn't taste like chicken says
The colour is amazing!! How can you not be drawn to this flamingo pink!? I'm with you all the way.
Congrats on the new magazine!!! Super excited to see it.
Meg says
Thank you so much Sam!! I happen to love flamingo pink...probably more than I should;)
Anna says
Oh my gosh these colours are amazing!! This is such a beautiful recipe, thank you for sharing it.
Meg says
Thank you so much Anna!