Over the past few weeks I have been experimenting a lot with apples. Mainly because Thanksgiving is quickly approaching and I have yet to find a suitable replacement for my favorite gluten-laden apple pie. I know, it's not even Halloween yet and I am already obsessed with the grand finale of my gluten-free Thanksgiving dinner, but it is THAT important!
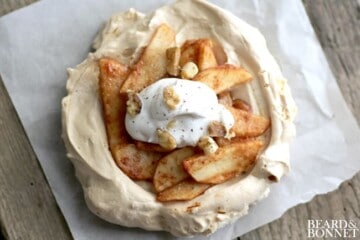
One of my absolute favorite gluten-free treats is meringues and in the summer there is nothing better than a light airy pavlova covered in macerated berries. I decided that in the spirit of Halloween I would channel my inner mad scientist and create an autumnal pavlova. Full of warm flavors and spice, but still keeping that light and airy feel that I love about a summer berry pavlova.
Infused with the flavors of maple, cinnamon and vanilla this has been my families favorite apple creation yet! The apples alone are amazing spooned over vanilla ice cream, oatmeal or even straight from the oven off of the sheet pan. I think my favorite thing about this dish though is that all of the components to this dessert can be made in advance and are easily assembled when you are ready to serve. Heck, I may even set up a mini-pavlova dessert table with a few autumnal favorites as toppings for our guests to assemble themselves.
Maple Pavlova
Makes 6 individual sized pavlova's
4 egg whites, room temperature
pinch of salt
2 tsp. champagne vinegar
1 tsp. cornstarch
1 tsp. gluten-free vanilla extract
½ cup maple sugar
½ cup + 2 Tbsp. granulated sugar
Heat oven to 200°F with the rack in the bottom ⅓ of the oven. Use individual sized ramekins to trace circles with pencil onto parchment paper. Line a baking sheet with the parchment, marking side down.
In a food processor, fitted with the blade attachment, combine the maple sugar and the granulated sugar and process until the sugar crystals have been broken down. You are looking for the consistency of superfine sugar.
In the bowl of an electric mixer fitted with the whisk attachment, beat egg whites on low-speed until they are frothy. Add the salt, vinegar, and cornstarch and beat on medium speed until soft peaks form. This will take between 3-4 minutes. Add the maple sugar mixture in 3 additions, mixing well between each addition. Beat on medium-high speed until meringue is stiff and glossy, between 3-5 minutes. Add vanilla and mix until combined.
Divide the meringue evenly between the marked circles on the parchment and use the back of a spoon to thin out the center of the pavlova, creating a well, while building up the sides as you fill in the circles. You want the outer walls of the pavlova to be at least an inch high. Bake until the meringue is glossy and hard to the touch,about 1 hour and 30 minutes. *Normally a pavlova is bright white and you would reduce the temperature if it began to take on too much color. Due to the addition of the maple sugar these pavlova will be slightly golden in color anyways. When the pavlova is cooked through, turn off the oven and leave the pavlova to cool in the oven for at least 2-3 hours or overnight. When completely cooled the pavlova will lift easily from the parchment. Keep in an airtight container for up to 2 days.
Roasted Cinnamon and Vanilla Apples
4 Rome apples, peeled, cored and sliced into ¼ inch pieces
2 Tbsp. light brown sugar
juice of 2 lemons
1 tsp. cinnamon
2 Tbsp. Earth Balance or butter, diced small
½ of a vanilla bean pod, scraped
1 tsp. corn starch
Preheat oven to 400°F and line a baking sheet with parchment paper. Slice apples and toss them with the lemon juice to prevent browning. Combine the apples with the remaining ingredients and mix well so that all of the apples are coated. *I even toss in the pod to the vanilla bean after scrapping the seeds.
Roast in the oven until the apples are tender, about 30-35 minutes. If not using immediately store in an airtight container in the fridge and reheat before use.
Vanilla Coconut Whipped Cream
1 can of full fat coconut milk, refrigerated overnight
½ tsp. gluten-free vanilla extract
1 Tbsp.powdered sugar
Place a can of full fat coconut milk in the refrigerator overnight to chill completely. About 5-10 minutes before making the whipped cream place your mixing bowl into the freezer to get really nice and cold. When ready to make the whipped cream remove the can from the fridge and flip it upside down. Open the can and pour off the coconut water into a separate container. *Reserve the coconut water for another use, it is really good mixed into smoothies! You will be left with only the solid white coconut cream at the bottom of the can, transfer this into the medium-sized mixing bowl that has now been in the freezer fora few minutes.
With a hand mixer, whip the hardened coconut cream until fluffy. It really is amazing how quickly the consistency changes and starts to resemble whipped cream. Add in the vanilla and the powdered sugar and mix again until combined.*You could also use a liquid sweetener for this like Stevia drops or maple syrup. Use immediately or store in a covered container in the fridge for up to a week. It will firm back up in the fridge so you will need to whip it again before use.
Assemble:
There is no wrong or right here. You can stack it all up like I did in the picture above and top it with toasted walnuts and grated nutmeg or set all the components out on a buffet table and let your guests assemble themselves.
We are happy to have shared this post at the Gluten-Free Friday’s link up party hosted by Vegetarian Mama, Eat.Live.Make, and Gluten Freed R.D.! Hop on over to find more great gf recipes.


Ruxandra says
Amazing recipe! I'll try it this weekend 🙂
admin says
I hope that you enjoy it!
jaime @ sweet road says
So a pavlova is sort of like a meringue? I have always been a bit confused by it, but I love your maple apple take on the recipe.
admin says
Hi Jaime,
Thank you! I was confused by Pavlova's for a long time too, it took going on a gluten-free diet to try them. They are like really big meringues covered in fruit...can't go wrong there!
sara says
Lovely! This dessert looks absolutely delicious. 🙂
admin says
Thanks Sara!