
The Day of the Dead is one of the neatest holidays! From altars to flowers, we will go over the steps you need to take to have an awesome DIY Day of the Dead celebration.
If I had to put all of my favorite things in numerical order it would go something like this:
- Family
- Friends
- Food
- Flowers (Marigolds for Day of the Dead!)
- Fiestas (ok, I could have used parties here, but I was on a roll with the "f" thing, so I just went for it!)
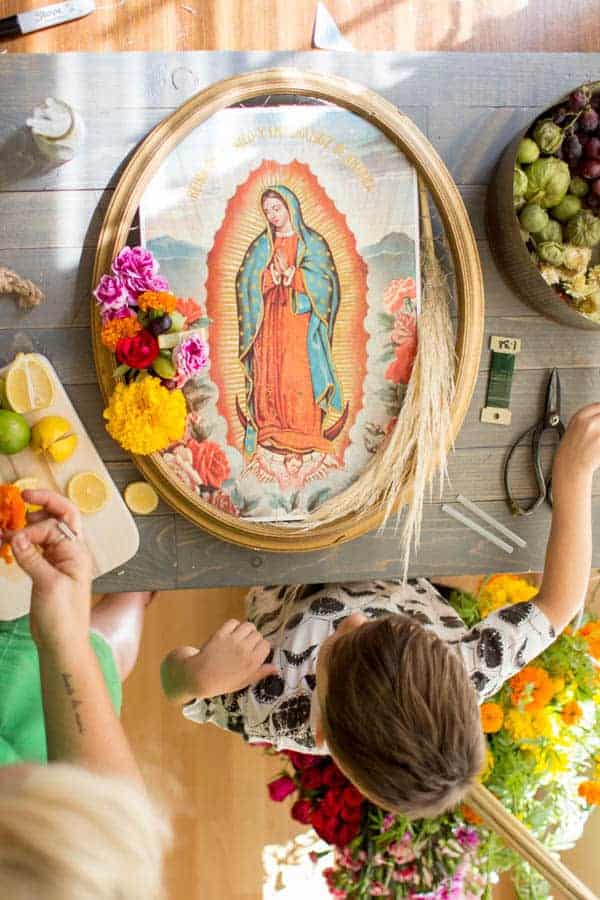
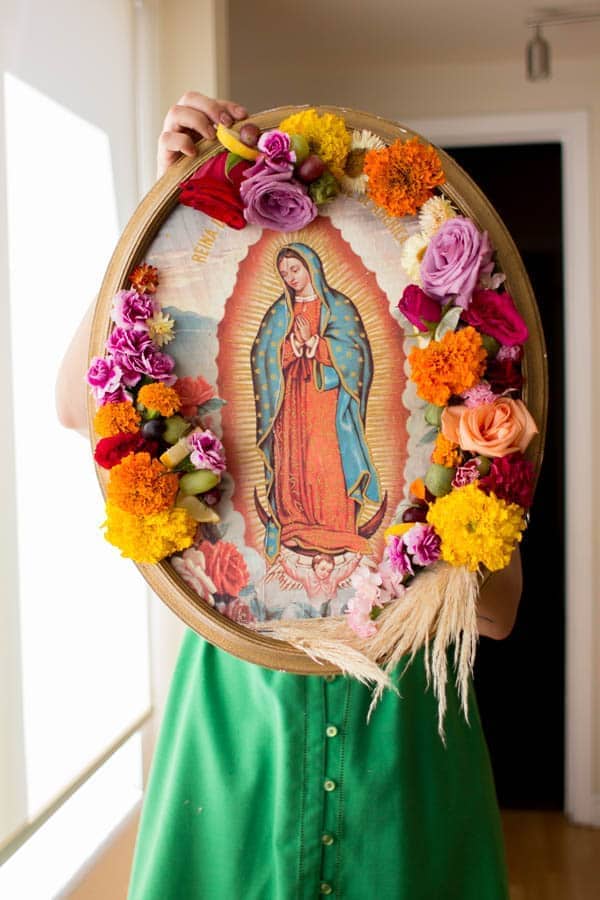
Today ALL of those things are coming together in this one post and I couldn't be more excited! I am teaming up with my wonderful friends at Melissa's Produce and the coolest flower diva I have ever had the privilege of meeting Mer Ambruso to share a fun little DIY about how to make the floral and fruit Day of the Dead altars we had decorating our feast a few weeks ago. These mini altars are fun to make, easy enough for your kids to help, relatively inexpensive and they dry beautifully so you can enjoy them for months to come.
Here's what you will need to make your own fruit and flowers Day of the Dead mini altar:
- Empty frame - any size will work, it just depends on how big you want the altar to be. We picked up ours at the flea market!
- Cardboard
- Images printed out as closely to the size of your frame as possible - we Google searched images of the Lady of Guadalupe for this one.
- Gluten free "wheat" paste, recipe follows.
- Paint brush
- Chicken wire
- Wire cutters
- Utility knife/ shears
- Duct tape
- Assorted fruit: tomatillos, grapes and citrus fruit all work great
- Fresh/dried flowers: carnations, roses, marigolds. (We shopped Trader Joe's for fresh blooms & scoured our yards!)
- Floral wire
- Hot glue gun and glue sticks
Step 1: Make the gluten free "wheat" paste & secure the image
Combine 1 part sweet white rice flour to 4 parts water in a saucepan over medium-high heat. Whisk constantly to prevent clumping. Heat to just below a boil, remove from the heat and let cool slightly. Use immediately or transfer to an airtight container. Can be stored in the refrigerator for up to 2 days.
When ready to assemble your altar brush a light layer of "wheat paste" onto the piece of cardboard that you will be using to fit into the frame. Center your image over the cardboard and once you are happy with the position, start at the center of the image and use your hands to apply gentle pressure out towards the edges. When the image is adhered to the cardboard and the air pockets are worked out (some wrinkling is to be expected) brush a light layer of "wheat" paste over the top. Allow to dry completely; a few hours will do it, but overnight is best.
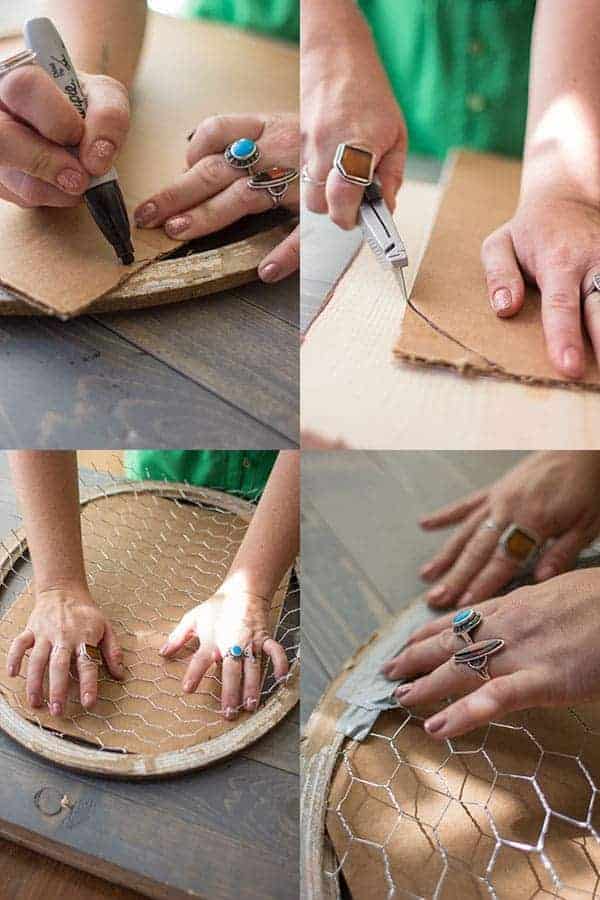
Step 2: Secure the image into the frame
Use wire cutters to cut a piece of chicken wire that is roughly the same size and shape as the back outside edge of the frame, set aside. Lay the mounted image over the frame, mark any overhang and cut off the excess with a utility knife or shears. Press the cardboard image into the frame then place the chicken wire over the top. Use small strips of duct tape all around the edge of the frame covering the edges of the chicken wire and securing the wire to the frame.
Step 3: Secure large flowers to the Day of the Dead altar
Start by collecting any large floral pieces or ornamental grasses you want to use. These pieces can easily be woven through the chicken wire to secure them in place. Begin snipping the large flower heads leaving a few inches of stem to work with. Push floral wire through the base of the head, position the bulb onto the chicken wire by pushing the stem through and then twist the 2 ends of the floral wire to the chicken wire, sort of like securing a bread tie.
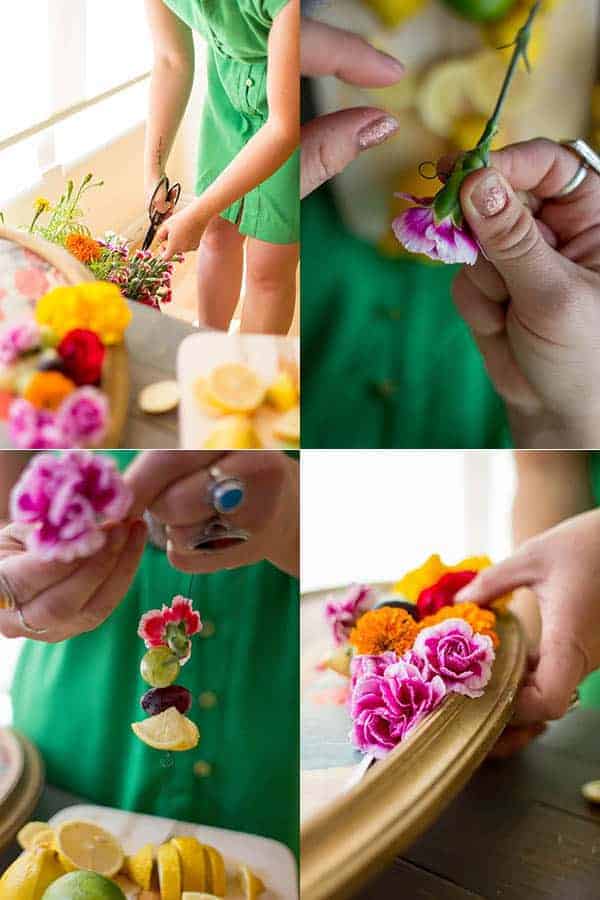
Step 4: Fill in any gaps by weaving in garlands made of small florals and pieces of fruit
At this point you will have areas of your altar with small gaps that you need to fill. Clip a piece of wire 6-8 inches in length, make a key hole at the top of the wire by creating a loop and twisting the end of the wire around itself. Begin stringing on small flower buds, grapes, lemon wedges, tomatillos, etc. Once the garland is complete make a second key hole at the end of the garland to secure. Fill in the gaps on the altar by twisting the garland around the larger florals, arranging fruit and flower pieces to cover any gaps. To secure the garland to the frame clip another small section of wire and thread its ends together through the key holes and around the chicken wire on the back of the frame. Complete this process until you can no longer see any gaps.
Step 5: Secure and hang your altar
Secure any unruly pieces in your altar by using little dots of hot glue and gentle pressure. Once the pieces are secure you are ready to hang your altar! Be sure that if you plan to dry your altar after the feast that you remove the fresh fruit and vegetables from your display. Then fill in those gaps with more fresh or dried florals.
This post contains affiliate links, which means that if you click on one of the product links we have included in this post and purchase something, we’ll receive a small percentage from the retailer. This income helps us to maintain and operate this site.
If you’ve tried this tutorial on DIY Day of the Dead Altars, I would be so grateful if you would rate it. Let me know what you think in the comments below. I just love hearing from you, and your reviews and comments really help others that visit This Mess is Ours!
Want to be a part of our online community outside of the blog? It’s easy!! All you have to do is follow @THISMESSISOURS on FACEBOOK, INSTAGRAM, TWITTER, YOUTUBE, or PINTEREST to see cooking demos and peeks into our day to day life.
Frequently Asked Questions
Leave a Reply