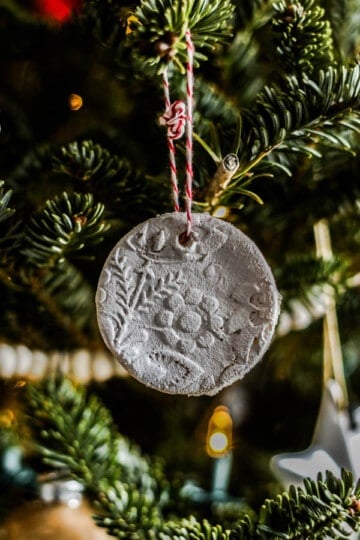
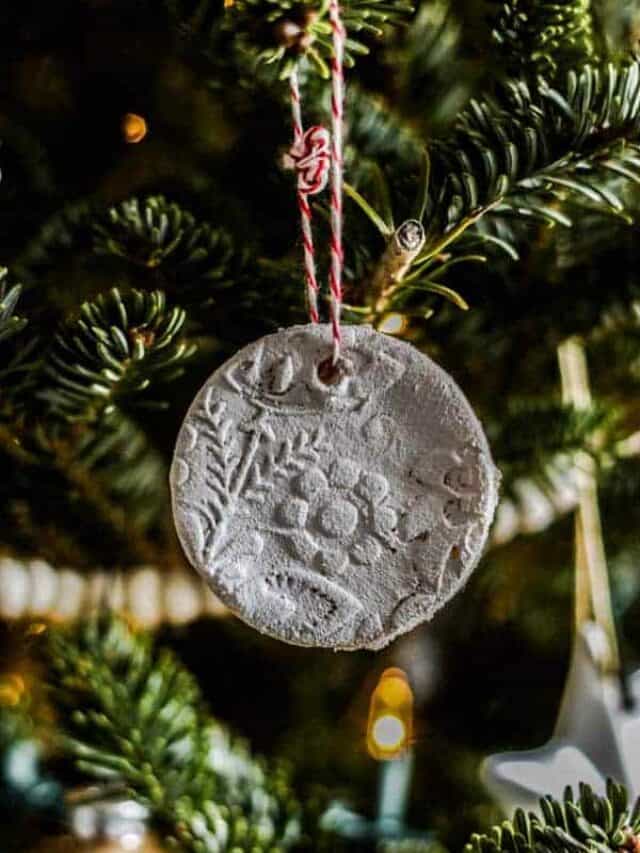
One of our favorite holiday traditions as a family is making salt dough ornaments! I'm just always amazed at how beautiful they are considering all that is required to make them is flour, salt and a bit of water. We have been making these for years with the kid's and each year's creation is unique and special in its own way. Our gluten free salt dough ornaments look festive on the Christmas Tree and do double duty as beautiful DIY name tags for the gifts we wrap!
***THIS POST UPDATED 12/11/2020 with new images, content, links to other informative salt dough articles, and recipe updates.****
What are salt dough ornaments?
The art of the salt dough making is an ancient one, dating back to Egyptian times! In Europe, specifically Germany, this craft became a very popular way of decorating homes at festive times. When immigrants started migrating to the United States from Germany and settling here they brought these beautiful handmade works of art and the craft with them. It wasn't until the late 1970's though that the personalized salt dough ornament craze hit the country and their popularity spread.
If you don't eat them why make salt dough ornaments gluten free?
Some people have such severe reactions to gluten that they can’t even come in contact with it, or breath the particles in the air so making ornaments like this, or playing with play dough can cause problems for them. I developed this recipe and my gluten free play dough recipe when my son was very small and we continue to use them to this day. However, if you don't need to use gluten free products the measurements below will work cup for cup with regular all purpose flour as well.
How are salt dough ornaments formed and decorated?
There are no right or wrong ways to decorate salt dough ornaments! It's all about your imagination and the look you are trying to achieve.
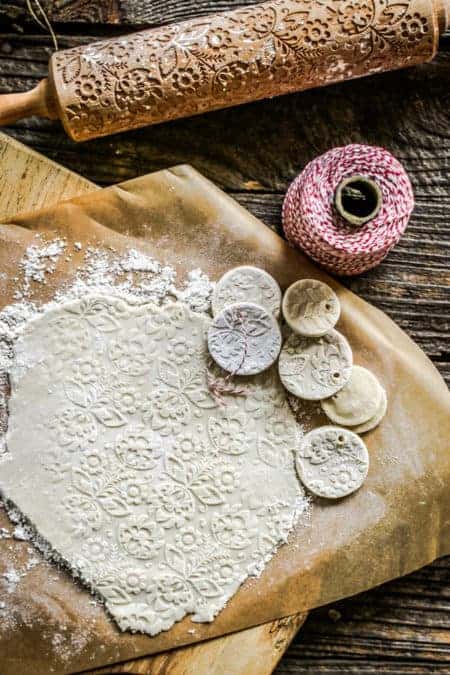
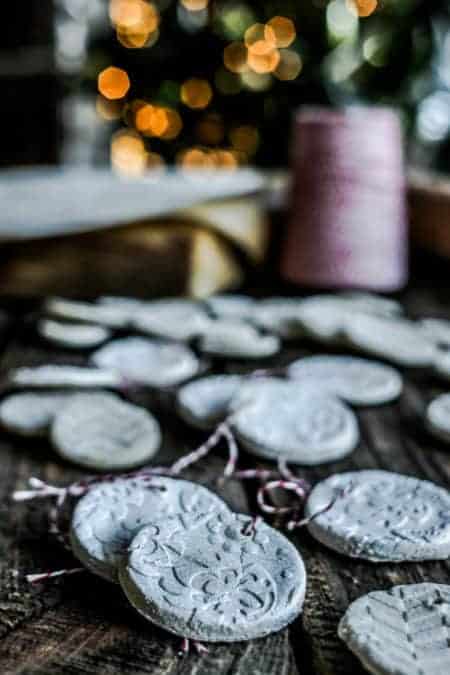
You can use the salt dough similarly to clay or play dough and create 3D salt dough sculptures or roll the dough flat into slabs like we did and cut out shapes with cookie cutters. You are literally only limited by your imagination. .
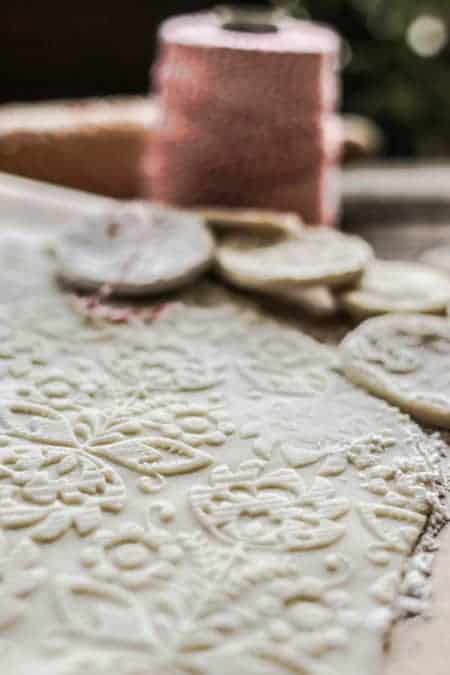
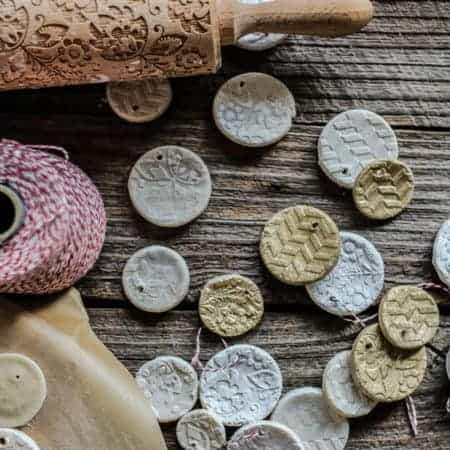
Want to make an impression in your salt dough? Literally, any random object that you have lying around your house that has a fun texture like forks, straws, pine cones, rubber stamps, or cookie cutters will work. You can also quickly create smooth round discs for imprints of your children's hands and feet or even your puppy's cute little paws by rolling the dough out into a thin slab, making the desired impressions and then using cookie cutters to cut out the shapes! I personally love using my engraved rolling pins for this project - it makes quick work of decorating a big slab of dough in a hurry!
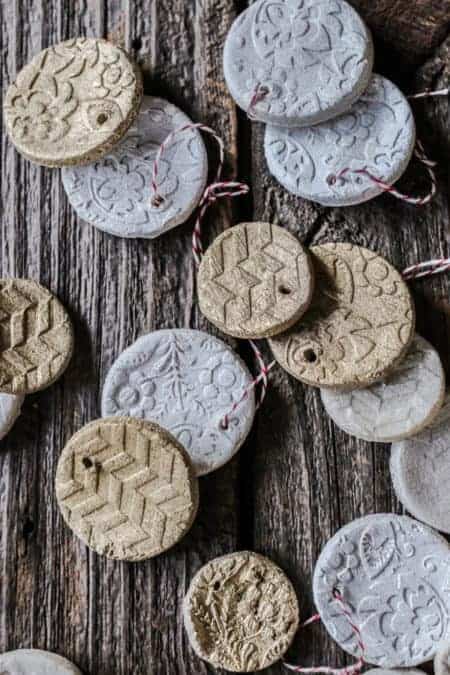
After salt dough ornaments have completely dried they are ready for decoration round 2!!! I find that they are the perfect canvas for decorating with acrylic paint, glitter and even markers!!

How are salt dough ornaments dried?
One of the great things about salt dough sculptures is that they will harden if you leave them out to dry at room temperature! Depending on the size of the pieces, it will take 2 to 7 days to dry completely, turning the pieces from time to time for faster drying. If you want to speed up the process I suggest baking the gluten free salt dough ornaments.
If you’ve made our Gluten Free Salt Dough Ornaments I would be so grateful if you would rate the recipe and let me know what you think in the comments below!
PrintHow To Make Gluten Free Salt Dough Ornaments

Don’t forget to rate the recipe and let me know what you think about our Gluten Free Slat Dough Ornaments in the comments below, I just love hearing from you and your reviews/comments really help other people that visit This Mess is Ours!
Ingredients
½ cup table salt
1 cup all purpose gluten free flour or regular all purpose flour if not gluten free
½ cup + 1 tablespoon warm water
paint
clear varnish
Instructions
In a dry mixing bowl combine the salt and gluten free flour, mix until fully blended. Add the water and stir until the dough has started to combine. If the mixture seems too dry you can add more water a teaspoon at a time or if it is too wet add more flour a teaspoon at a time.
When it is hard to stir, use your hands to knead until the surface is soft and smooth.
Form the dough into a large ball then divide into two pieces. Place one piece of dough on top of a lightly floured piece of parchment paper and the other in a bowl with a slightly damp cloth over it to keep the unused dough from drying out. Place a second piece of parchment over the dough on the counter and roll over the top with rolling pin until desired thickness.
Now that the dough is in a thin slab you can make impressions/designs in the dough, if you like. I use a rolling pin that has a relief pattern carved into it, but you could use almost anything! Just lay it on the dough and roll over it with a rolling pin to create the impression. Cut the dough into desired shapes with cookie cutters. Then use a toothpick at the top of each ornament/tag to create a hole wide enough to string it later.
Bake at 200° F for 4-6 hours to completely evaporate the moisture from the dough. Completely cool. Decorate with acrylic paint or spray paint to decorate, then spray with clear varnish to seal the ornament.


Susan Kuess says
I made a batch of kid footprints and handprints for the oven. they all raised like a pizza with bubbles - a top layer separated in all their footprints. Any idea what I did wrong? I want to correct it for the next batch.
Eliza Clendenin says
Thanks for your comment! It sounds like your salt dough ornaments had a bit of a puffing issue. This can happen for a couple of reasons:
Overworking the Dough: If the dough is kneaded too much, it can become overly elastic and might rise more than expected. Try to mix until the dough is just combined and then let it rest a bit before shaping.
Too Much Baking Soda: Sometimes, an excess of baking soda in the dough can cause it to puff up. Make sure you’re measuring accurately and sticking to the recipe proportions.
Oven Temperature: If the oven temperature is too high, the dough can expand too quickly, causing bubbles. Double-check your oven temperature with an oven thermometer to ensure it's accurate.
Thickness of Ornaments: If the ornaments are too thick, they might not dry evenly. Aim for a consistent thickness across all your pieces for more even baking.
Try adjusting these factors for your next batch, and hopefully, you'll get the flat, perfect handprints and footprints you’re aiming for. Happy crafting!
Cara says
We are a wheat free household due to allergy. This recipe is wonderful and easy! We were looking for a new family tradition and this is it! Thank you:)
meg@thismessisours says
Oh my goodness Cara, you just made my day!!! I am SO glad you and your family loved the recipe and have found a new tradition. I just love looking back at the ones we made when the kid's were younger! They are like little treasures!
Tara Hill says
How much does this create...I am hoping to do 8 hand prints (ages range from 3 -5) would one batch be enough or should I create more than one batch?
thismess says
I think you should have enough, but you will be cutting it close. I would probably make 2 batches just to make sure. Happy holidays!
Tair says
Can this be left to dry on the bench or in the sun instead of in the oven?
thismess says
I'm not sure, I've never tried to dry these without the help of an oven. I imagine they would dry out, but would just take longer. If you give it a try please, let me know.
Lisa says
Why does the non edible cookie have to be gluten free? I don't understand.
thismess says
Some kids have such severe reactions to gluten that they can't even come in contact with it, so making ornaments like this, or playing with play dough can cause problems for them. Our son was very much so this way when he was younger. As he has grown older his immune system has strengthened and his section isn't severe like it used to be.
Ashley says
Do NOT use almond flour lol! Or really just play with it. We doubled the amount of flour and salt to water and it's still too liquidy, even having rested in the fridge too so we're scrapping and starting over.
thismess says
Oh no!!! Thank you for letting us know that almond flour doesn't quite measure up!
Anonymous says
Because even touching wheat can kill some kids who have wheat allergy.
Sincerely,
A mom to a toddler who is anaphylactic to wheat.
Saniel says
Can I make this with oat flour?
Meg says
I haven't tried it with oat flour, but it's worth a shot:) You may need to add more liquid than when using gfree all purpose flour. Please let me know how it works out.
Kelsey says
I tried it with oat flour, and it turned out nicely! I used a tablespoon more oat flour because the dough was a little sticky.
thismess says
So very glad to know these work with oat flour as well!! Happy holidays!