
Waking to freshly baked pastries is one of my greatest holiday memories. These decadent Gluten-Free Cinnamon Rolls feel like childhood.
For me, the holidays have become more about making truly memorable moments for my kids than anything else. I feel like as parents it's our responsibility to keep the traditions that our family has passed down in place for our children. We create the atmosphere and we teach our kids the true meaning of the season so that they can pass it down one day to their own children.
This year I really want to focus on creating our own tradition for our kids and I want it to be in the form of quality time together. Since they are both in school now our lives are overwhelmingly busy and even though we are all together during the week, I still miss them! (How is that even possible?) I can't think of a better way to make a memory than to have my children in the kitchen with me for a few hours creating a decadent batch of gluten-free homemade cinnamon rolls that we can enjoy together on Christmas morning!
There is nothing better than waking up to the smell of cinnamon rolls baking in the oven! I am a big fan of the fact that most of the actual work that goes into creating this recipe can be done the night before with our kids, so no one has to wake up at the crack of dawn on a holiday morning to get breakfast on the table! The whole process to make these luscious gluten-free cinnamon rolls takes a few hours, which means we can listen to our favorite holiday records while we prep the dough and even watch our family's favorite Christmas movie while we wait for it to rise.
I have to admit it took quite a few tries to get this recipe just right. I kneaded, I rolled and I baked for a solid week before these sweet gems came to fruition, but I have to say that every single second of that time was well worth it. These gluten-free cinnamon rolls are total game changers and dare I say, memory makers!
My first few attempts at baking these cinnamon rolls were honestly a bit frustrating. I was having trouble creating a soft, pillowy dough that held up when I rolled it. It wasn't until I remembered that growing up I had a friend whose mom made her cinnamon rolls with mashed potatoes in the dough. Seriously, mashed potatoes! I thought it was weird at the time, but hey, who the heck was I to judge?! The woman was a goddess in my eyes because she made us homemade cinnamon rolls for our sleepover! I'm not sure if this is just a southern thing or not, but let me tell you it was just the extra oomph these babies needed to really hit the mark in both flavor and texture.
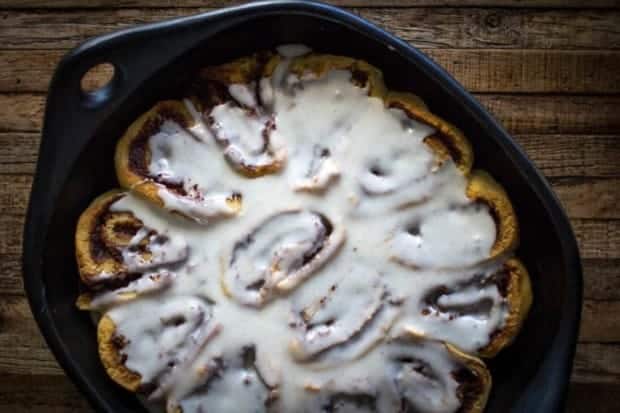
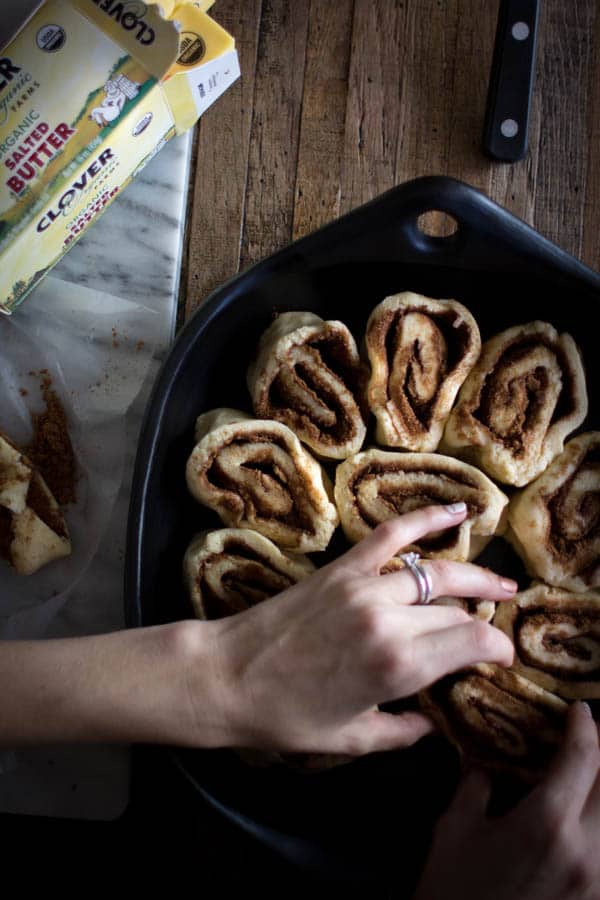
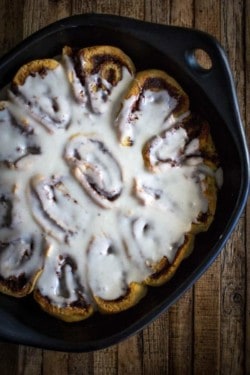
I tried baking these a variety of different ways, but I have found that they really bake up the best when they are nestled all close together in a deep baking dish like my La Chambra handmade pottery I recently picked up from Alta Baja Market. They rise so perfectly when they are close like that creating perfect little peaks and valleys for the vanilla bean scented icing!
Just look at those gorgeous spirals! A true labor of love that is sure to be an ongoing family tradition for the holidays in our house and who knows maybe you will be inspired to start a new cinnamon-flavored holiday tradition too.
If you’ve tried this Decadent Gluten-Free Cinnamon Rolls Recipe, I would be so grateful if you would rate it. Let me know what you think in the comments below. I just love hearing from you, and your reviews and comments really help others that visit This Mess is Ours!
PrintDecadent Gluten Free Cinnamon Rolls
Just a friendly FYI: The recipe time reflected here does not take into account the 1 hour 25 minute time this dough needs to rest and rise. Also, I have found that using Press & Seal Wrap for the cling wrap really makes working with the dough easier, because the Press & Seal Wrap sticks to itself making working the dough easier and cleaner!
Don’t forget to rate the recipe, and let me know what you think about these Decadent Gluten Free Cinnamon Rolls in the comments below. I just love hearing from you. Your reviews/comments really help other people that visit This Mess is Ours!
- Yield: 1 dozen 1x
Ingredients
- 1 ½ cups super fine sweet rice flour, divided
- 1 cup super fine brown rice flour, divided, plus more for dusting countertop
- ½ cup tapioca flour, divided
- ½ cup cornstarch, divided
- 1 teaspoon or guar gum or xanthan gum
- 1 teaspoon baking powder
- 1 package active dry yeast
- 1 cup Clover Organic Milk
- 1 cup unseasoned mashed potato
- ⅓ cup Clover Organic Salted Butter (5 tablespoons + 1 teaspoon), cut into cubes
- ⅓ cup granulated sugar
- 1 teaspoon kosher salt
- 2 eggs
- 1 cup packed brown sugar
- 2 tablespoons ground cinnamon
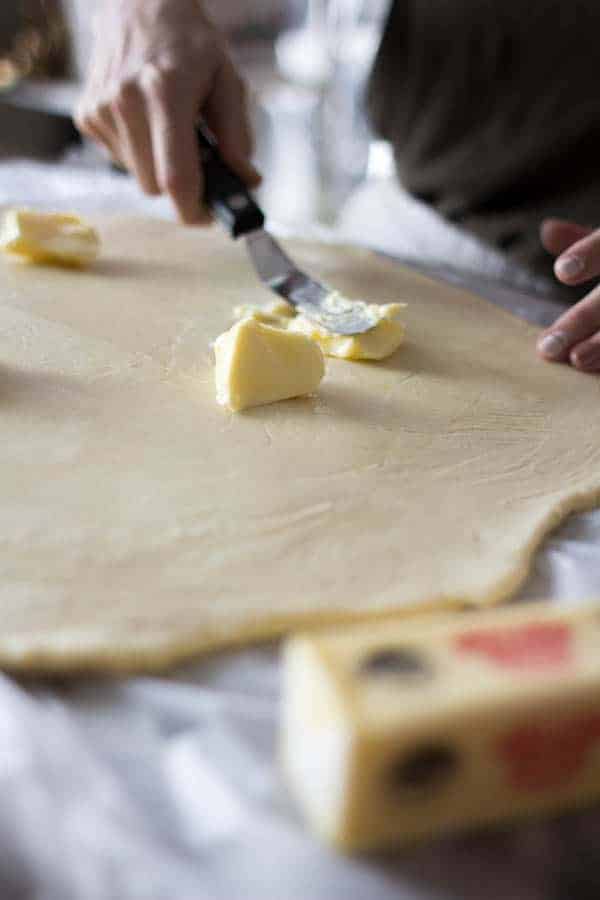
- ¼ cup Clover Organic Salted Butter, softened
Vanilla Bean Scented Icing
- 1 ½ cups powdered sugar
- ½ teaspoon vanilla bean paste or vanilla extract
- 4-6 teaspoons Clover Organic Milk
Instructions
- In a large bowl combine ½ cup sweet rice flour, ½ cup brown rice flour, ¼ cup tapioca flour, ¼ cup cornstarch, xanthan gum, baking powder and the yeast; set aside.
- In a medium saucepan heat and stir the milk, mashed potato, the ⅓ Clover Organic Salted Butter, granulated sugar and salt just until warm (120° F to 130° F) and the butter is almost melted; add to the flour mixture along with the eggs. Beat with an electric mixer on low to medium speed for 30 seconds, scraping the sides of the bowl twice. Beat on high speed for 3 minutes.
- Using a spatula, stir in an additional ½ cup sweet rice, ½ cup brown rice, ¼ cup tapioca and ¼ cup cornstarch until incorporated. Line a clean counter top with 2 sheets of cling wrap slightly overlapping each other. Lightly dust the cling wrap with sweet rice flour then turn the dough out on top of it. The dough will be sticky at this point, sprinkle ¼ cup more sweet rice flour over the top of the dough then use the outside of the cling wrap to help you fold the dough over on top of itself repeatedly until the flour is completely worked into the dough. Repeat this process with the remaining ¼ cup of sweet rice flour.This kneading process will take about 5 minutes.
- Once all of the flour has been incorporated place the dough in a lightly greased bowl, turning once to grease the entire surface of the dough. Cover; let rise in a warm place until doubled in size. (45-60 minutes)
- Line the counter again with 2 large sheets of cling wrap that slightly overlap at the center and sprinkle lightly with sweet rice flour. Punch down the dough. Turn the dough out onto the floured surface then cover and let rest for 10 more minutes.
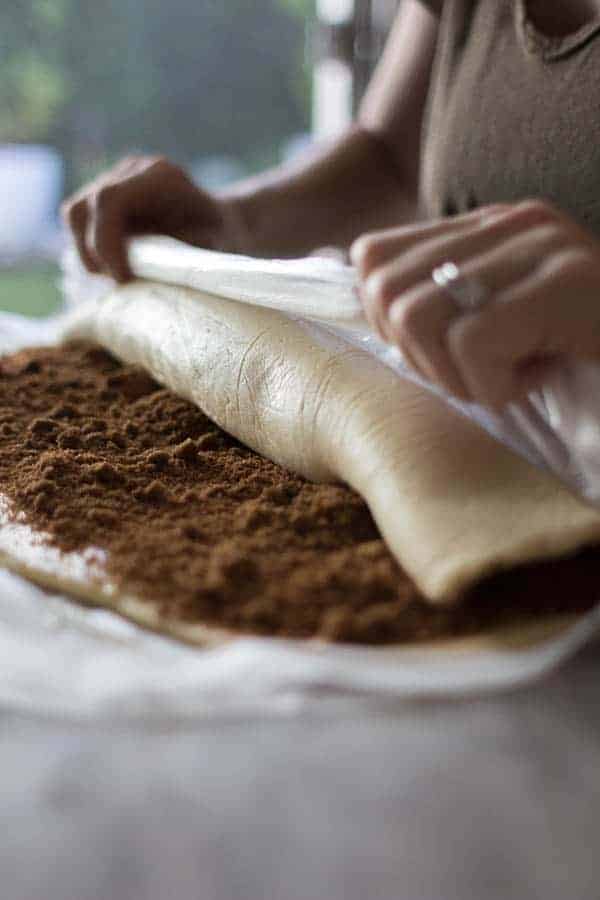
- Meanwhile, lightly grease an 8 x 12 x 2-inch pan ( or a 3 quart rectangular baking dish) and set aside. Make the filling by mixing the brown sugar and cinnamon together in a small bowl; set aside.
- Place 2 more sheets of cling wrap on top of the dough, gently press down to flatten then roll the dough into an 18x12-inch rectangle. Spread the ¼ cup softened Clover Organic Salted Butter over the dough. Sprinkle the filling over the butter-spread dough rectangle, leaving 1 inch unfilled along one of the long sides. Roll up the filled rectangle into a spiral, starting from the long side with the filling. Pinch dough to seal seams.
- Cut the dough spiral into 12 equal pieces. Arrange the pieces, cut sides down, in the prepared baking pan. Cover with a clean kitchen towel and place on the middle rack of your unheated oven; with a bowl of very warm water on the lower rack. Let rise until nearly double in size (about 30 minutes).
- Remove the pan of rolls from the oven; uncover and set aside. Preheat oven to 375° F. Bake for 25 to 30 minutes or until golden brown and done in center. Cool in the pan on a wire rack for 10 minutes before drizzling rolls with icing. Serve warm.
Vanilla Bean Scented Icing
- In a small bowl whisk together the powdered sugar, vanilla bean paste and milk.If the mixture seems too thick add a bit more milk, too thin more sugar. (I tend to double the recipe for the icing so we can really drench our cinnamon rolls in it!)
Notes
MAKE-AHEAD:
Prepare the Cinnamon Rolls as directed through Step 8, except do not let rise after shaping. Cover loosely with oiled waxed paper, then with plastic wrap. Chill for at least 2 hours or up to 24 hours. Before baking, let chilled rolls stand, covered, for 30 minutes at room temperature. Uncover and bake as directed.
Want to be a part of our online community outside of the blog? It’s easy!! All you have to do is follow @THISMESSISOURS on FACEBOOK, INSTAGRAM, TWITTER, YOUTUBE, or PINTEREST to see cooking demos and peeks into our day to day life.


Leave a Reply